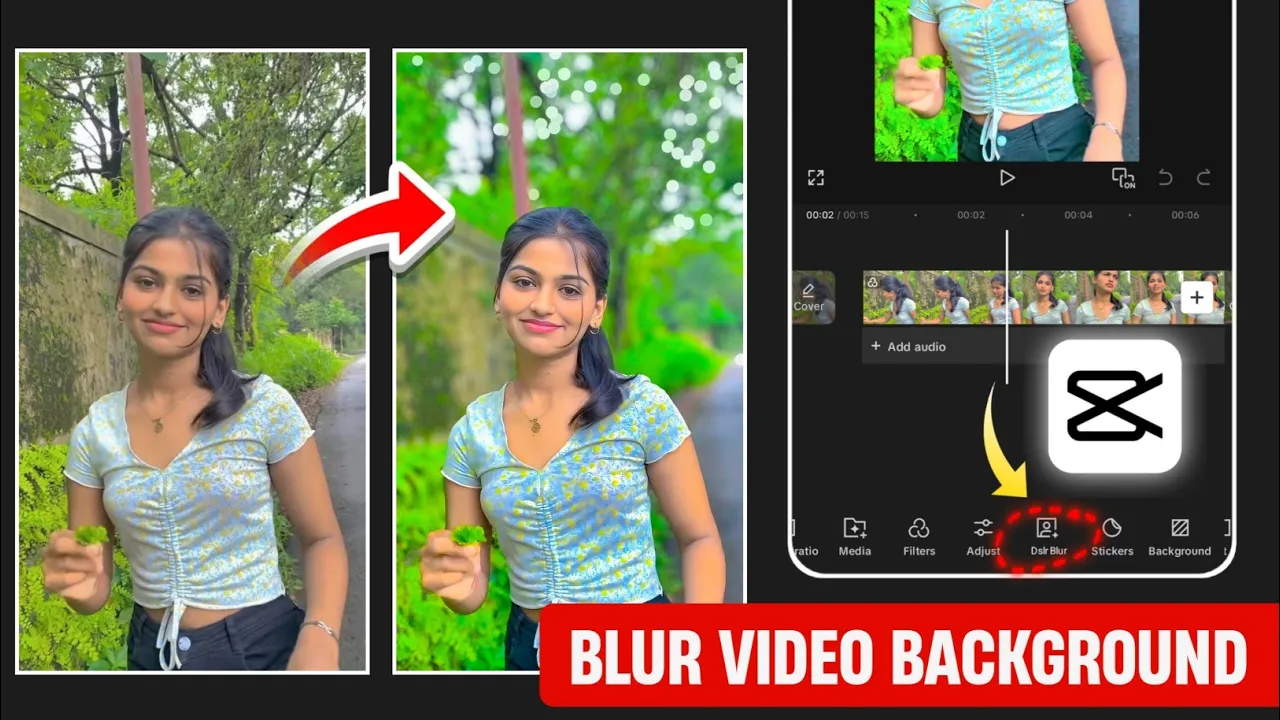
How to Create DSLR-Style Blur Background in CapCut for Viral Instagram Reels
Hey guys! Welcome back to another exciting tutorial. Today, we’re diving deep into how you can blur the background of your videos just like a DSLR using the CapCut app. This technique makes your video 10x better and significantly increases your chances of going viral on Instagram Reels or any social platform.
So make sure to follow every step till the end, because this method is both powerful and surprisingly simple!
🎬 What You Need Before You Start
- A working version of the CapCut App
- A VPN app (any free VPN from the Play Store)
- A video you want to edit
If you don’t have CapCut installed, download it and connect to a VPN before launching the app to avoid any regional restrictions.
🚀 Step 1: Start a New Project in CapCut
- Open CapCut and tap on New Project.
- Select the video you want to edit and hit Add.
- Your video will now load into the timeline with a basic interface.
🎯 Method 1: Use Spot Blur Effect
- Tap on Effects > Video Effects.
- Go to the search bar and type Spot Blur.
- Select the Spot Blur effect that appears first.
- Tap Apply, then Done.
Now, your background should look like it has that DSLR “bokeh” blur. You can enhance it further:
- Glow: Increase to give a cinematic glow to the background.
- Intensity: Adjust to make the blur stronger or softer.
- Range: Leave it default unless you want to shift the focus zone.
Apply the effect to the entire video to get consistent blur throughout the clip.
✨ Method 2: Use Focus Filter
If you want an even better result with built-in color grading, try this:
- Tap on your video, scroll to Filters.
- In the search bar, type Focus.
- Select the Focus filter from the top results.
This filter not only adds blur but also boosts your video’s color profile, giving it a cinematic finish. Adjust the blur intensity, and you’ll notice a much richer output than the Spot Blur.
🎨 Bonus: Adjust Brightness & Colors Like a Pro
After applying the blur, let’s do some light color correction:
- Click on your video and go to Adjust (next to Filter).
- Increase the following for better visuals:
- Brilliance – to boost overall brightness
- Brightness – to light up dark areas
- Saturation – to enhance colors
- Sharpness – for clarity
- Clarity – for crisp textures
🎯 Advanced Color Grading with HSL
Use the HSL tool to fine-tune individual colors:
- Green: For nature vibes or cinematic yellow tones
- Blue: Adjust sky color
- Hue/Saturation/Lightness: Control each color’s shade, vibrancy, and brightness
Play with these settings to give your video a professional-grade look similar to high-end music videos or cinematic shorts.
💆 Face Whitening Shortcut
Want your face to pop or look fairer? Try this quick hack:
- Tap on the video, scroll and find Retouch.
- Go to Face > Select the face > Tap Skin Tone.
- Choose the white skin tone and increase intensity.
Use Whitening to further lighten the face, but don’t overdo it—keep it natural!
💾 Export in High Quality
Once your editing is done, export the video in the best quality possible:
- Tap on the export button (top-right corner).
- Set the resolution and frame rate to maximum.
- Hit Export to save the video to your device.
🔗 Useful Resources
- CapCut’s Official Background Remover Tool
- Pixlr – Free Online Photo Editor
- Download CapCut (Android)
- Download CapCut (iOS)
🎉 Final Thoughts
And there you have it! With just a few steps, you can turn your ordinary video into a visually stunning, DSLR-style masterpiece using the CapCut app. Whether you’re creating content for Instagram Reels, YouTube Shorts, or TikTok, this blur background trick can skyrocket your engagement and watch time.
Liked this tutorial? Be sure to check out our Telegram Channel for more video editing hacks and app recommendations!
Until next time, stay creative and keep spreading happiness! 😊