This effect makes any part of your video stand out in an attractive way, increasing audience engagement. If you use this technique in your YouTube Shorts or Instagram Reels, your video has a much higher chance of going viral because it grabs viewers’ attention.
So, make sure to watch till the end, and let’s get started!
Step-by-Step Guide to Adding a Highlight Effect in CapCut
Step 1: Install & Open CapCut
-
First, make sure you have the CapCut app installed. If not, download it from the Google Play Store or Apple App Store.
-
Since CapCut may require a VPN in some regions, connect to a VPN before opening the app.
Step 2: Import Your Video
-
Open CapCut and click on “New Project.”
-
Select the video you want to edit and click “Add.”
-
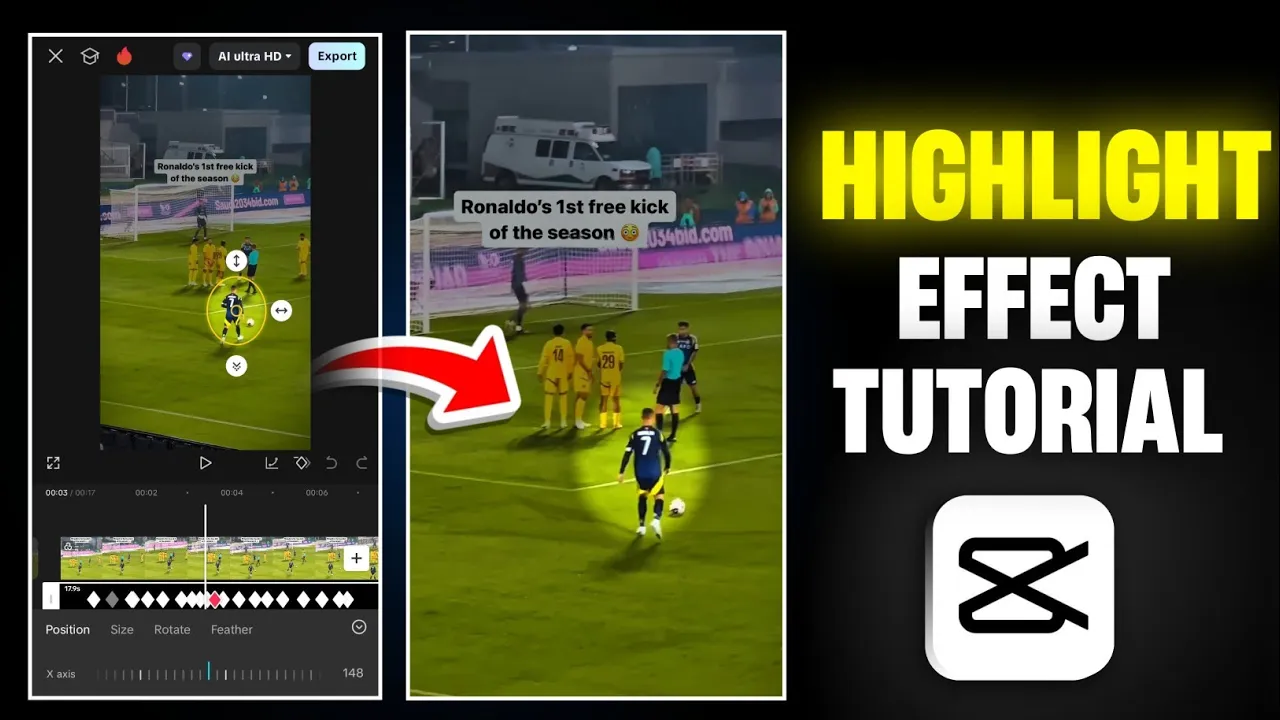
For this tutorial, I’m using a clip of Cristiano Ronaldo taking a free kick.
Step 3: Add a Black Overlay
-
Tap on “Overlay” → “Add Overlay.”
-
Go to the Photos section and add a black image (if you don’t have one, I’ve provided a link in the description).
-
Adjust the black overlay to cover the entire screen.
-
Extend its duration to match the full length of your video.
Step 4: Apply Masking Effect
-
Click on the black overlay layer and scroll to find the “Masking” option.
-
Select “Circle Mask” (the most effective for highlighting).
-
Enable “Invert” to reveal only the highlighted area.
-
Position the circle over the subject you want to highlight (in this case, Ronaldo).
Step 5: Adjust Opacity & Feathering
-
Reduce the opacity of the black overlay (around 40% works well).
-
Use the feathering option to soften the edges for a smoother effect.
Step 6: Keyframe the Highlight Effect
-
As your subject moves, you need to track it using keyframes.
-
Move the playhead to different points and adjust the circle’s position & size to keep the subject highlighted.
-
For zoom effects, increase the circle size accordingly.
Step 7: Enhance Video Quality (Optional)
-
Go to “Effects” → “Video Effects” → “Lens” and apply HDR or Smart Sharpen for better clarity.
-
Adjust settings like sharpness and blur for a professional look.
Step 8: Export Your Video
-
Once satisfied, click “Export” and choose the highest quality settings.
-
Your video is now ready to upload!
Why Use the Highlight Effect?
-
Boosts engagement by directing focus to key elements.
-
Increases retention as viewers stay hooked on the highlighted subject.
-
Makes your content stand out in competitive platforms like TikTok, Reels, and Shorts.
Pro Tip:
Spend time perfecting the keyframes—smooth tracking makes the effect look professional.
Final Thoughts
This simple yet powerful technique can dramatically improve your video’s appeal. Try it in your next edit and see the difference!